Welcome, fellow plant enthusiasts, to our in-depth exploration of one of the most sought-after botanical treasures: Monstera seeds.
In the world of indoor gardening, Monstera deliciosa is a perennial favorite known for its iconic split leaves and adaptability to various environments.
While it’s more common to propagate Monstera through cuttings, cultivating them from seeds offers a unique and rewarding experience.
In this complete guide, we’ll delve into the fascinating world of Monstera seeds, covering everything from seed acquisition to nurturing these green beauties into thriving plants.
Table of Contents
Understanding Monstera deliciosa
Before we dive into the intricacies of Monstera seeds, let’s take a moment to appreciate the plant itself.
Monstera deliciosa, also known as the Swiss Cheese Plant, is native to the rainforests of Central and South America. Its iconic fenestrations, or leaf splits, are an adaptation to allow sunlight to reach lower parts of the plant in its natural habitat.
Understanding the plant’s natural environment is crucial for successfully germinating Monstera seeds.

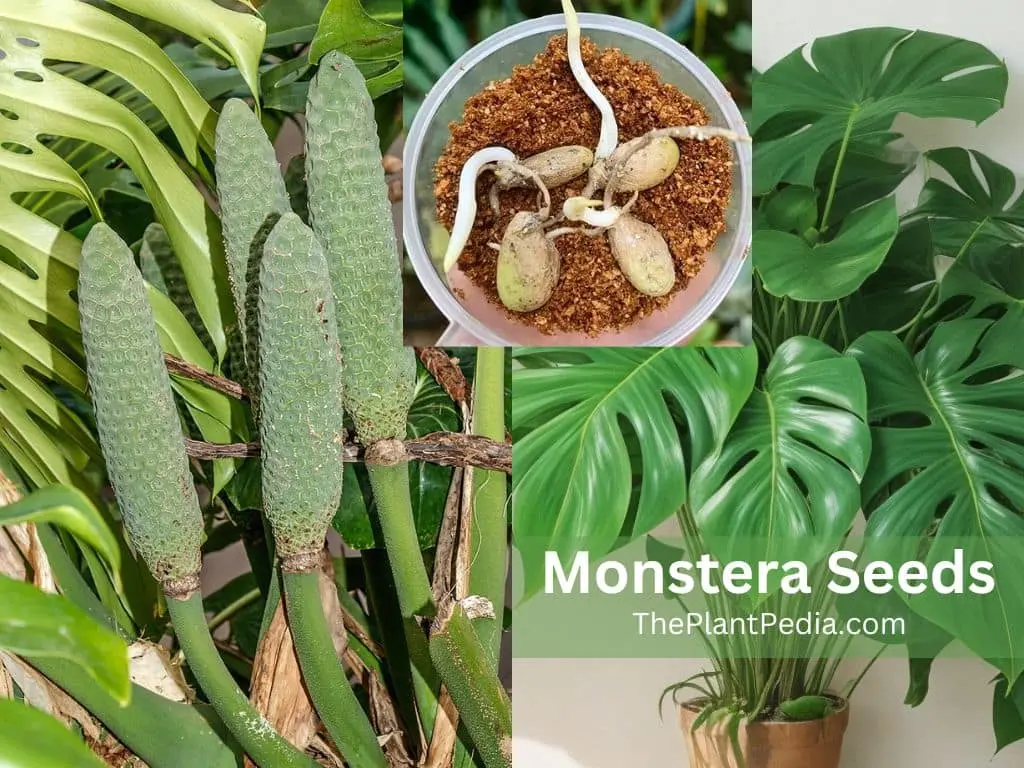
What Do Monstera Seeds Look Like?
Monstera seeds are small, round, and typically dark brown to black in color. They bear a resemblance to oversized peppercorns.
The outer shell of a Monstera seed is hard and durable, providing protection for the embryonic plant inside.
This tough coating is a natural adaptation to help the seed survive in the wild until conditions are favorable for germination.
When extracting seeds from a mature Monstera fruit, you’ll find them nestled within the pulp. Each seed is encased in a gel-like substance.
It’s important to handle them with care to avoid damaging the fragile embryonic plant within. After extraction, rinsing the seeds under tepid water helps remove any residual pulp, leaving you with clean, ready-to-plant seeds.
Before sowing, it’s advisable to examine the seeds closely. Look for any signs of damage or abnormalities. Healthy Monstera seeds will have a uniform color and size, indicating viability.
Remember, successful germination starts with healthy, viable seeds. Taking the time to inspect and clean your Monstera seeds will set the stage for a successful propagation process.
Read: Monstera Fruit: Care, How to Eat, Taste, Benefits & All.
Flowering and Seed Production in Monstera
Monstera plants are known for their unique foliage, but they don’t typically produce flowers and seeds under normal indoor conditions.
However, it is possible for a mature and healthy Monstera to flower and produce seeds, although it is relatively rare.
Conditions for Flowering and Seed Production:
- Maturity: A Monstera plant needs to be mature before it has the potential to flower. This usually takes several years and requires a healthy, well-cared-for plant.
- Optimal Growing Conditions: Providing the right conditions, including proper lighting, temperature, humidity, and watering, can encourage a Monstera to flower. Consistent care and a stable environment are key.
- Outdoor Exposure: Some Monstera plants, when grown outdoors in their natural habitat or in tropical climates, are more likely to flower and produce seeds. This is because they experience conditions more similar to their native environment.
- Cross-Pollination: If you have multiple Monstera plants, there’s a chance they can cross-pollinate. This would require specific arrangements to ensure that the plants have an opportunity to transfer pollen.
Recognizing Flowers and Seeds:
- Flowers: Monstera flowers are small, white, and arranged on a spadix. They are typically surrounded by a modified leaf called a spathe. The flowers are not showy and are often hidden within the foliage.
- Seeds: After successful pollination, Monstera plants will produce small, berry-like fruits. These fruits will contain seeds. The seeds are small and typically dark brown to black in color.
Timing of Flowering and Seed Production:
The exact timing of flowering and seed production can vary widely and is influenced by factors such as the age and health of the plant, environmental conditions, and genetics.
For Monstera plants grown indoors, it’s important to note that flowering is not a guaranteed occurrence. Even in optimal conditions, it may still be a rare event.
If you’re specifically interested in obtaining Monstera seeds, consider sourcing them from reputable sellers or by propagating through other methods like stem cuttings or air layering.
Remember, the primary appeal of Monstera plants lies in their stunning foliage, and the rare occurrence of flowering and seed production is an added bonus for the dedicated gardener.
Caring for Monstera for Healthy Seeds
Ensuring your Monstera plant is in optimal health is essential for producing viable, high-quality seeds. Here’s a comprehensive guide on how to care for your Monstera to promote healthy seed production:
1. Provide Proper Lighting:
Monstera plants thrive in bright, indirect light. Avoid placing them in direct sunlight, as this can scorch the leaves.
Consider placing your Monstera near a window with sheer curtains or using a grow light to supplement natural light.
2. Maintain Consistent Temperature:
Monstera plants prefer a warm, tropical environment. Keep the temperature between 70-75°F (21-24°C) during the day and avoid drastic temperature fluctuations. Avoid exposing your plant to cold drafts.
3. Ensure Adequate Humidity:
Monstera plants are native to tropical rainforests and thrive in high humidity. To mimic their natural environment, use a humidifier or place a tray filled with water and pebbles near your plant. Misting the leaves regularly can also help increase humidity levels.
4. Watering Practices:
Allow the top inch or two of soil to dry out before watering. When you do water, ensure that excess water drains freely from the pot to prevent waterlogged roots.
Use room-temperature water and avoid letting your plant sit in standing water.
5. Choose the Right Pot and Soil:
Use a well-draining potting mix that provides good aeration for the roots. Ensure the pot has drainage holes to prevent water from pooling at the bottom.
6. Support and Pruning:
As your Monstera grows, it may benefit from a support structure like a moss pole or trellis to encourage upright growth. Regular pruning can also help maintain its shape and promote healthy growth.
7. Fertilize Appropriately:
During the growing season (spring and summer), feed your Monstera with a balanced, water-soluble fertilizer every 4-6 weeks. Avoid over-fertilizing, as this can lead to nutrient burn and other issues.
8. Inspect for Pests:
Regularly check your plant for signs of pests like spider mites, aphids, or mealybugs. If you notice any, treat your plant with natural remedies or insecticidal soap.
9. Ensure Cross-Pollination (if applicable):
If you have multiple Monstera plants and are interested in producing seeds, ensure they have the opportunity to cross-pollinate.
You may need to manually transfer pollen from one plant to another using a small brush or cotton swab.
By providing your Monstera with the right conditions and attentive care, you’ll not only enjoy a healthy and thriving plant, but you’ll also increase the likelihood of obtaining healthy, viable seeds for propagation.
Obtaining Monstera Seeds
When it comes to obtaining Monstera seeds, you have two primary options: harvesting seeds from mature fruit or sourcing them from reputable sellers.
Harvesting Seeds from Mature Fruit
Harvesting Monstera seeds from mature fruit is a rewarding and cost-effective method, especially if you have access to a mature Monstera plant. To do this:
- Wait for Full Ripeness: It’s crucial to wait until the Monstera fruit is fully ripe. Immature fruit may not yield viable seeds. A ripe Monstera fruit will have a pleasant aroma and feel slightly soft to the touch.
- Extracting Seeds: Once the fruit is fully ripe, gently cut it open. Inside, you’ll find clusters of seeds embedded in the pulp. Carefully separate the seeds from the pulp, taking care not to damage them.
- Cleaning Seeds: Rinse the seeds under tepid water to remove any remaining pulp. Allow them to air dry before proceeding.
Keep reading to learn more about collecting Monstera seeds.
Sourcing Seeds from Reputable Sellers
For those without access to mature Monstera plants, or if you’re looking for specific varieties or hybrids, purchasing seeds from reputable sellers is a viable option. Here are some tips to consider:
- Choose a Trusted Vendor: Look for reputable nurseries or online seed shops known for their quality and reliability. Read reviews and seek recommendations from fellow gardening enthusiasts.
- Check for Quality Assurance: Ensure that the seeds are fresh, well-packaged, and labeled with relevant information, including the plant species and any specific growing instructions.
- Verify Seed Viability: While it’s not always possible to assess seed viability visually, reputable sellers often provide information about the seed’s age, storage conditions, and expected germination rates.
- Consider Your Location: Depending on your region, certain vendors may specialize in seeds that are better suited to your climate and growing conditions.
Remember, whether you choose to harvest seeds from a mature plant or purchase them from a reputable seller, starting with healthy, viable seeds is the foundation for a successful Monstera propagation journey.
Collecting Monstera Seeds
While Monstera plants are primarily propagated through cuttings or air layering, it is possible to collect seeds if your Monstera has flowered and produced fruit.
Here is a step-by-step guide on how to collect Monstera seeds:
1. Identify Mature Fruit:
Wait for your Monstera to produce mature fruit. These fruits are typically green and resemble a cluster of unripe bananas. It’s important to allow the fruit to fully ripen on the plant.
2. Harvesting the Fruit:
Once the fruit is fully ripe, carefully cut it from the plant using clean, sharp scissors or pruning shears. Be gentle to avoid damaging the seeds inside.
3. Extracting the Seeds:
Inside the ripe fruit, you’ll find clusters of seeds embedded in the pulp. Gently separate the seeds from the pulp. Take care not to damage the seeds, as they are delicate at this stage.
4. Cleaning the Seeds:
Rinse the seeds under tepid water to remove any remaining pulp. Gently agitate the seeds with your fingers to ensure they are clean. Allow them to air dry on a paper towel.
5. Scarification (if needed):
Monstera seeds have a hard outer shell that can inhibit germination. Scarification involves nicking or lightly sanding the seed coat to facilitate germination. This step is optional, but it can improve germination rates.
6. Soaking the Seeds:
After scarification (if performed), soak the seeds in tepid water for about 24 hours. This helps soften the seed coat and encourages germination.
7. Storing the Seeds (if necessary):
If you’re not ready to plant the seeds immediately, you can store them in a cool, dry place in an airtight container. Ensure they are kept away from moisture and extreme temperatures.
8. Sowing the Seeds:
Plant the scarified and soaked Monstera seeds in a well-draining potting mix, burying them about 1 inch (2.5 cm) deep. Space them evenly to allow for proper root development.
9. Germination Conditions:
Provide consistent warmth (around 70-75°F or 21-24°C) and ensure the seeds receive indirect, filtered sunlight. Keep the growing medium consistently moist but not waterlogged.
10. Monitor and Care for Seedlings:
As the seedlings emerge, gradually introduce them to light and continue to provide optimal care, adjusting watering and light levels as the plant grows.
Remember, germinating Monstera seeds can be a slow process and success is not guaranteed. However, with patience and care, you may be rewarded with new Monstera plants from your collected seeds.
Storing Monstera Seeds
If you’ve collected Monstera seeds and are not ready to plant them immediately, proper storage is crucial to maintain their viability.
Here’s how you can store Monstera seeds:
1. Cleaning and Drying:
Ensure that the seeds are thoroughly cleaned and completely dry before storing them. Rinse them under tepid water to remove any remaining pulp, and then allow them to air dry on a paper towel.
2. Use an Airtight Container:
Choose an airtight container that will protect the seeds from moisture, air, and temperature fluctuations. A small glass or plastic container with a secure lid is ideal.
3. Add a Desiccant (optional):
To further reduce moisture and humidity within the container, consider adding a desiccant packet. Silica gel packets, commonly found in packaged goods, are effective at absorbing excess moisture.
4. Label the Container:
Label the container with the date of collection and the plant species (Monstera). This helps you keep track of the seeds and their freshness.
5. Store in a Cool, Dark Place:
Find a cool, dark spot to store the container. Avoid locations with temperature fluctuations, as well as areas prone to high humidity or direct sunlight. A pantry, cupboard, or drawer in a climate-controlled room is a suitable choice.
6. Avoid Freezing Temperatures:
While Monstera seeds are generally hardy, extreme cold can damage them. Ensure that the storage location stays above freezing.
7. Regularly Check for Moisture:
Periodically check the container for any signs of moisture. If you notice condensation inside the container, it may be an indication that the seeds need to be dried again before resealing.
8. Test Germination Periodically:
Over time, the viability of seeds can diminish. To check if the seeds are still viable, you can perform a germination test by planting a few seeds in a separate pot.
9. Replenish Desiccant (if used):
If you’ve included a desiccant packet, consider replacing it periodically, especially if it becomes saturated.
By following these steps, you can effectively store Monstera seeds for an extended period, ensuring they remain viable for future propagation efforts.
Remember to maintain a consistent environment within the storage container to preserve the seeds’ quality.
Preparing for Germination
Now that you have obtained your Monstera seeds, the next crucial step is to prepare them for germination.
This process involves extracting the seeds from the fruit, cleaning them, and then scarifying and soaking to encourage successful germination.
Seed Extraction and Cleaning
Extraction Process: Gently separate the seeds from the pulp of the mature Monstera fruit. Exercise caution to avoid damaging the seeds, as they are delicate at this stage. Take your time and use a gentle touch to ensure the seeds remain intact.
Rinsing and Cleaning: Once the seeds are extracted, it’s essential to remove any residual pulp. Rinse them under tepid water, gently agitating them with your fingers. This process helps eliminate any remaining debris and ensures that the seeds are clean and ready for the next stage.
Scarification and Soaking
Understanding Scarification: Monstera seeds have a tough outer shell, which can hinder germination. Scarification involves creating small nicks or abrasions on the seed coat, allowing moisture to penetrate and encourage the emergence of the embryonic plant.
Methods of Scarification: There are several methods you can use for scarification:
- Nick with a Blade: Using a clean, sharp blade, carefully make a small nick on the seed coat. Be cautious not to cut too deeply, as this may harm the embryo.
- Sandpaper Abrasion: Gently rub the seeds on fine-grit sandpaper. This method provides controlled abrasion, promoting water absorption.
- Hot Water Treatment: Pour hot (but not boiling) water over the seeds and let them soak until the water cools. This process softens the seed coat and prepares it for germination.
Soaking Seeds: Following scarification, soak the seeds in tepid water for approximately 24 hours. This step serves to further soften the outer shell and promote the emergence of the embryonic plant.
By carefully preparing your Monstera seeds through extraction, cleaning, scarification, and soaking, you’re creating the ideal conditions for successful germination.
This process helps break down the barriers that may inhibit the emergence of the embryonic plant, setting the stage for a healthy and thriving Monstera seedling.
Choosing the Right-Growing Medium
Selecting the appropriate growing medium is a critical factor in the success of your Monstera seed germination.
A well-draining and nutrient-rich medium provides the essential support and nourishment for young seedlings.
Characteristics of an Ideal Growing Medium:
- Well-Draining: Monstera seeds are susceptible to rotting if left in overly waterlogged conditions. A well-draining medium allows excess water to flow away from the roots, preventing waterlogged soil.
- Aeration: Adequate aeration is essential for healthy root development. A medium that allows for the exchange of oxygen and carbon dioxide promotes strong, robust roots.
- Nutrient-Rich: While Monstera seedlings do not require heavy feeding initially, a medium with some nutrient content provides a good start for early growth. However, avoid overly rich soils that may lead to excessive vegetative growth at the expense of root development.
- pH Balance: Aim for a neutral to slightly acidic pH level in the growing medium. This range allows for optimal nutrient uptake by the seedling.
Choosing a Suitable Growing Medium:
- Commercial Seed Starting Mixes: These specialized mixes are designed to provide the ideal conditions for germination and early seedling growth. They typically contain a balanced blend of peat moss, perlite, and vermiculite.
- DIY Mixes: You can create your own custom medium using a combination of components like peat moss, perlite, coconut coir, and well-composted organic matter. This allows you to tailor the medium to suit your specific growing conditions.
- Sterilized Soil: If you choose to use garden soil, ensure it is well-drained and free from pests and diseases. Sterilizing the soil in an oven or using a commercial sterilization method can help eliminate potential pathogens.
- Hydroponic or Aeroponic Systems: These soilless systems provide an alternative to traditional growing mediums. They deliver nutrients directly to the roots in a controlled environment, minimizing the risk of soil-borne diseases.
Regardless of the medium you choose, it’s crucial to ensure that it is clean and free from contaminants.
Providing the right growing medium sets the stage for healthy root development and establishes a solid foundation for your Monstera seedlings to thrive.
Remember to monitor moisture levels and adjust watering practices accordingly to maintain optimal conditions.
Sowing and Germination
With your Monstera seeds cleaned, scarified, and the growing medium prepared, it’s time to move on to the exciting phase of sowing and germination.
Seed Depth and Spacing
Planting Depth: When sowing Monstera seeds, it’s important to achieve the right balance. Plant the seeds at a depth of approximately 1 inch (2.5 cm).
This allows them to be securely nestled in the growing medium while still having access to the necessary oxygen for germination.
Spacing: Ensure that you space the seeds evenly. Providing sufficient space allows each seedling to have ample room for root expansion as they grow.
Typically, a spacing of about 2-3 inches (5-7.5 cm) between seeds is recommended.
Germination Conditions
Temperature: Maintaining a consistent temperature is crucial for successful germination. Aim for a range of 70-75°F (21-24°C). Using a seedling heat mat can help regulate temperature if your environment tends to fluctuate.
Lighting Conditions: While Monstera seeds don’t require intense light during germination, they do benefit from indirect, filtered sunlight.
Placing them near a window with sheer curtains or using a grow light with low intensity can provide the necessary light exposure.
Moisture Levels: Keep the growing medium consistently moist, but avoid overwatering, as this can lead to damping-off and root rot.
A spray bottle or misting system can be useful for maintaining optimal moisture levels without disturbing the seeds.
Patience is Key: Germination can be a slow process, and it’s not uncommon for Monstera seeds to take several weeks to sprout. Be patient and maintain consistent germination conditions throughout this period.
Monitoring Progress: Regularly check for signs of germination. Look for the emergence of tiny green shoots from the soil. Once germination occurs, continue to provide appropriate care to support the seedlings’ growth.
By carefully following these steps, you’ll be providing your Monstera seeds with the best possible start. Remember, each seed is a potential new plant, and with the right conditions and a little patience, you’ll soon be rewarded with the sight of young Monstera seedlings emerging from the soil.
Nurturing Your Monstera Seedlings
Congratulations on the successful germination of your Monstera seeds! Now, as they transition from delicate sprouts to robust seedlings, providing the right care is crucial for their continued growth and development.
Light Requirements
Gradual Introduction to Light: As your Monstera seedlings emerge, it’s important to introduce them to light gradually. Begin with filtered, indirect sunlight. Avoid exposing them to harsh, direct sunlight, as this can scorch the delicate leaves.
Monitoring Light Levels: Observe how your seedlings respond to their light environment. Adjust their placement accordingly. If they appear to be stretching towards the light source, it’s an indication that they need more.
Supplemental Lighting: If natural light is limited, consider using a grow light to supplement illumination. Choose a light with a spectrum that mimics natural sunlight, and position it at an appropriate distance from the seedlings.
Temperature and Humidity
Maintaining Warmth: Continue to provide a consistently warm environment for your Monstera seedlings. Aim for a temperature range of 70-75°F (21-24°C) during their early stages of growth.
Humidity Considerations: Monstera seedlings thrive in humid conditions. To increase humidity, consider using a humidity dome or a misting system. This helps mimic the tropical rainforest environment they naturally inhabit.
Avoiding Drastic Temperature Fluctuations: Protect your seedlings from sudden temperature drops, as this can stress them. Avoid placing them near drafts or heating/cooling vents.
Watering and Soil Moisture
Maintain Even Moisture Levels: Consistency in watering is key. Keep the soil evenly moist but not waterlogged. Use a spray bottle to mist the surface of the soil if it begins to dry out between waterings.
Avoid Overwatering: Be cautious not to overwater, as this can lead to root rot. Ensure that excess water can drain freely from the pot.
Check Moisture Levels Regularly: Regularly assess the moisture levels by inserting your finger into the soil up to the first knuckle. If it feels dry at this depth, it’s time to water.
Transplanting and Continued Care
Transplanting Seedlings: Once your Monstera seedlings have developed sturdy roots and a few sets of leaves, they can be transplanted into larger pots. Choose a pot that provides ample room for root growth.
Fertilization: While Monstera seedlings do not require heavy feeding initially, you can introduce a diluted, balanced liquid fertilizer after a few months to provide a nutrient boost.
Monitor Growth and Adjust Care: Keep a close eye on your seedlings’ growth. Adjust watering, lighting, and other care practices as needed to meet their evolving needs.
By providing the right environment and care, you’ll nurture your Monstera seedlings into strong, healthy plants that will grace your indoor garden for years to come. Remember, each stage of their growth is a testament to your dedication and horticultural prowess.
Transplanting and Beyond
As your Monstera seedlings mature, they will eventually outgrow their initial pots. Transplanting them into larger containers is a crucial step to ensure their continued growth and development.
Knowing When to Transplant
Root Bound Signs: One of the most common indicators that it’s time to transplant is when the roots become visibly crowded and start to circle the inside of the pot. This can lead to stunted growth and nutrient deficiencies.
Stunted Growth: If you notice that your seedlings’ growth has slowed or they appear to be struggling, it’s a sign that they may be running out of space in their current container.
Consider the Season: Transplanting is best done during the plant’s active growing season, typically in the spring or early summer. This allows the plant to recover and establish itself in its new environment.
Transplanting Process
Selecting a New Container: Choose a new pot that is 1-2 inches larger in diameter than the current one. Ensure it has drainage holes to prevent waterlogging.
Preparing the Seedling: Gently remove the seedling from its current pot, being careful not to damage the roots. If the roots are tightly bound, tease them apart gently with your fingers.
Adding New Soil: Place a layer of well-draining potting mix at the bottom of the new pot. Position the seedling in the center and fill in around it with fresh potting mix. Gently press the soil down to secure the plant.
Watering After Transplanting: After transplanting, give the plant a thorough watering to help settle the soil and ensure good root-to-soil contact.
Continued Care
Adjusting Light and Watering: After transplanting, provide the plant with the same light and moisture levels it was accustomed to. Gradually reintroduce it to its previous lighting conditions if it was moved to a different location.
Monitoring Growth: Keep a close eye on your transplanted Monstera. Look for signs of stress such as wilting or yellowing leaves, and make any necessary adjustments to its care routine.
Fertilization: Once your Monstera is established in its new pot, you can begin to incorporate a balanced, diluted fertilizer into its care routine to provide additional nutrients for growth.
Remember, the process of transplanting can be stressful for plants, so be patient and continue to provide attentive care. With time, your Monstera will adapt to its new environment and thrive in its larger home.
Related FAQs:
How to Get Monstera Seeds?
- Harvest mature fruit from a mature Monstera plant.
- Extract seeds from the pulp and clean them thoroughly.
- Scarify and soak the seeds to encourage germination.
- Alternatively, purchase seeds from reputable sellers or nurseries.
How to Grow Monstera Seeds?
- Provide well-draining soil and proper lighting.
- Maintain consistent temperature and humidity levels.
- Water when the top inch of soil is dry.
- Gradually introduce seedlings to light.
- Transplant into larger pots as they grow.
Where Do Monstera Seeds Come From?
Monstera seeds come from mature Monstera plants that have produced flowers and subsequently fruits. The seeds are found within the mature fruit’s pulp.
How to Plant Monstera Seeds?
- Fill a pot with well-draining potting mix.
- Plant the scarified and soaked Monstera seeds about 1 inch deep.
- Space them evenly for proper root development.
- Provide indirect sunlight and consistent moisture.
- Monitor for germination and adjust care as needed.
Where to Buy Monstera Seeds?
You can purchase Monstera seeds from reputable nurseries, online seed shops, or specialized plant sellers. Ensure you choose a trusted vendor known for quality seeds.
How Long Does it Take for Monstera Seeds to Germinate?
Germination of Monstera seeds can be slow, taking anywhere from a few weeks to several months. Patience is key, as germination rates may vary.
How Long Do Monstera Seeds Take to Grow?
From germination to becoming a mature plant, it can take several years for Monstera seeds to grow into a fully developed specimen with characteristic split leaves.
How to Propagate Monstera Seeds?
Propagating Monstera seeds involves germinating them in a suitable growing medium, providing optimal conditions for growth, and transplanting them into larger pots as they develop.
Following the steps outlined earlier in this guide will help you propagate Monstera seeds successfully.
Conclusion
Cultivating Monstera plants from seeds is a gratifying endeavor that offers a unique perspective into the growth and development of this beloved species.
With patience, dedication, and a bit of horticultural know-how, you can watch your Monstera seeds transform into thriving, magnificent plants. Happy gardening!
